

Ever faced that annoying HTTP 529 error on your website, wondering why things suddenly went haywire?
If you’ve grappled with a traffic jam on your server, you’re not alone. This blog warmly welcomes you to the complex world of web tech, where server errors are a shared headache. Imagine this: your website, struggling to handle the rush, flashing the HTTP 529 error – not a sign of surrender, but an opportunity.
Here, we’re not just handing out fixes; we’re taking you on a journey to understand why the 529 Errors happens and what it means. Our goal is to arm you with more than just a quick solution – it’s about giving you a deep dive into the details, so you can confidently deal with and solve this digital hiccup. As we venture together through the world of server errors, you’ll come out with the tools and know-how for a website that’s not just strong but resilient. Let’s uncover the mysteries and make your digital experience rock-solid – come join us on this enlightening ride!
Contents
- 1 What is Error Code 529?
- 1.1 Common Causes of Server Error 529
- 1.2 8 Ways to Resolve HTTP 529 Errors
What is Error Code 529?
The 529 error, “The Service is Overloaded,” indicates that the server is grappling with an influx of incoming requests beyond its capacity. This issue commonly arises during periods of heightened user activity, unexpected surges in traffic, or when the server lacks adequate resources to efficiently handle the load. Essentially, the server becomes overwhelmed, hindering its ability to process and respond to requests in a timely manner.
High user engagement, such as during peak hours or popular events, can lead to a sudden increase in demands on the server. If the server’s resources, including processing power and memory, are insufficient for the heightened workload, it results in the 529 error. Additionally, unforeseen spikes in traffic, perhaps due to a sudden surge in popularity or viral content, can exacerbate this situation.
Understanding the error code 529 is implications is crucial for both users and administrators. It prompts the need for scalable solutions, such as server upgrades, load balancing, or implementing content delivery networks (CDNs), to enhance the server’s capacity and ensure a more resilient response to varying levels of demand. Addressing the root causes of the overload is essential for maintaining a stable and responsive online service.
Common Causes of Server Error 529
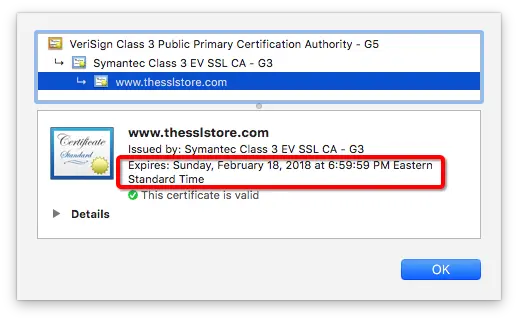
- Expired SSL Certificate: An expired SSL certificate is one of the most common causes of Server Error 529. Certificates typically have a validity period, and if the certificate has expired, the server will reject secure connections.
- Mismatched SSL Certificate: If the SSL certificate installed on the server does not match the domain or if there is a discrepancy in the certificate details, it can trigger a 529 error.
- Configuration Issues: Incorrect server configurations, such as misconfigured SSL settings or outdated protocols, can lead to the rejection of secure connections and result in Server Error 529.
- Firewall or Security Software: Overly strict firewall or security software settings may interfere with the SSL handshake process, causing the server to reject connections and trigger the error.
8 Ways to Resolve HTTP 529 Errors
STEP 1. Renew or Reissue SSL Certificate:
a. Check the SSL Certificate’s Expiration Date:
. Log in to your server or hosting provider’s control panel:
- Access the control panel provided by your hosting provider or log in to your server using secure methods.
b. Navigate to the SSL certificate section:
- Look for the section that manages SSL certificates. This might be named differently based on your hosting provider, such as “SSL/TLS Manager” or “Security.”
c. Inspect the expiration date within the SSL certificate details:
- Find the SSL certificate that you want to renew or reissue.
- Access the certificate details, which typically include information such as the certificate’s Common Name (CN), validity period, and issuer.
d. If expired, promptly renew through your certificate authority (CA):
- Identify the Certificate Authority (CA) that issued the SSL certificate. Popular CAs include Let’s Encrypt, Comodo, Sectigo, etc.
- Access the CA’s website or portal and follow their specific instructions for certificate renewal.
- Complete any required verification steps, which may involve confirming domain ownership.
e. Update SSL configurations:
- After successfully renewing the certificate, download the updated certificate files provided by the CA.
- Update the SSL configuration on your server. This involves replacing the old certificate files with the newly obtained ones.
- Configuration files are usually found in locations such as Apache’s
httpd.confor Nginx’snginx.conf.
f. Restart necessary services:
- Restart the web server to apply the changes. The specific command will depend on your server setup. For example:
- For Apache:
sudo service apache2 restartorsudo systemctl restart apache2 - For Nginx:
sudo service nginx restartorsudo systemctl restart nginx
- For Apache:
STEP 2. Update SSL/TLS Configurations:

a. Review Server Configurations:
- Access server configuration files:
- Identify the location of your server’s configuration files. For Apache, this could be
httpd.confor individual site configuration files; for Nginx, it might benginx.confor site-specific configuration files. - Use a text editor like
nanoorvimto open the configuration file.
- Identify the location of your server’s configuration files. For Apache, this could be
- Check SSL/TLS settings for accuracy:
- Look for the SSL/TLS-related directives within the configuration files.
- Verify settings such as SSL certificate paths, private key locations, and encryption algorithms.
- Identify and correct inaccuracies or outdated configurations:
- Check for deprecated or outdated configurations. For example, ensure that the SSL/TLS directives are in line with the latest security best practices.
- Correct any typos, missing configurations, or inconsistencies.
b. Update Configurations for Modern Protocols:
- Modify configurations for modern SSL/TLS protocols:
- Update the configuration to enable the use of modern protocols like TLS 1.2 or TLS 1.3.
- Example for Apache:
apache
SSLProtocol -ALL +TLSv1.2 +TLSv1.3
Example for Nginx:
nginxssl_protocols TLSv1.2 TLSv1.3;
- Disable obsolete protocols for improved security:
- Disable outdated and less secure protocols such as SSLv2 and SSLv3.
- Example for Apache:
apache
SSLProtocol -SSLv2 -SSLv3 -TLSv1 -TLSv1.1 +TLSv1.2 +TLSv1.3
Example for Nginx:
nginxssl_protocols TLSv1.2 TLSv1.3;
ssl_prefer_server_ciphers off;
- Restart necessary services for changes to take effect:
- After updating the configurations, restart your web server to apply the changes.
- Example for Apache:
bash
sudo service apache2 restart
Example for Nginx:
bashsudo service nginx restart
STEP 3. Optimize Firewall and Security Settings:
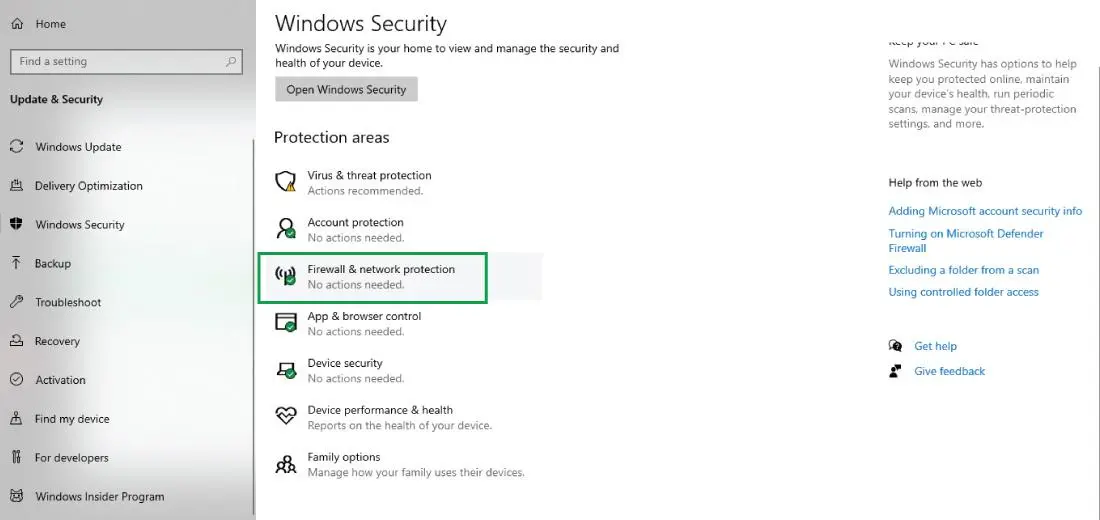
a. Ensure Firewall and Security Software Settings:
- Log in to your server or security software dashboard:
- Access the control panel or dashboard of your server’s firewall or security software. This could include software firewalls, intrusion detection systems (IDS), or other security solutions.
- Review SSL-specific settings and rules:
- Look for settings related to SSL or HTTPS traffic.
- Verify that the firewall is configured to allow incoming and outgoing SSL connections on the necessary ports (typically port 443 for HTTPS).
- Verify correct SSL interception or inspection configurations:
- If your security software performs SSL interception or inspection, ensure that it is configured correctly.
- Confirm that the SSL certificates used for interception are valid and trusted by clients.
- Confirm SSL certificate trust settings:
- Check the trust settings for SSL certificates in your security software.
- Ensure that the root and intermediate certificates in the certificate chain are trusted.
b. Temporarily Disable to Identify Interference:
- Temporarily disable firewall and security software:
- Disable the firewall or security software temporarily to identify if it is causing any interference with SSL connections.
- This step helps isolate whether security software is the source of any SSL-related issues.
- Monitor SSL connections for errors or warnings:
- While the security software is disabled, monitor your server logs for any SSL-related errors or warnings.
- Check your web server error logs and system logs for relevant information.
- Adjust settings to permit SSL connections:
- Based on the observations, adjust the firewall or security software settings to permit SSL connections.
- Update rules or configurations to allow secure connections through port 443.
- Re-enable software and monitor stability:
- After making adjustments, re-enable the firewall or security software.
- Monitor the stability of SSL connections to ensure that the changes do not negatively impact the server’s security or performance.
STEP 4. Verify DNS Settings:

a. Confirm DNS Accuracy:
- Log in to your domain registrar or DNS provider’s website:
- Access the website of the service where you registered your domain or manage your DNS records (e.g., GoDaddy, Namecheap, Cloudflare).
- Navigate to DNS management:
- Look for the DNS management or DNS settings section in your domain registrar’s control panel.
- Review DNS records for accuracy:
- Check the existing DNS records, especially those related to your website or application.
- Ensure that the A (IPv4) or AAAA (IPv6) records point to the correct IP address of your server.
- Update records if needed:
- If the IP address has changed or if there are inaccuracies in the DNS records, update them accordingly.
- Add or edit records to reflect the correct information.
- Test SSL connection after changes:
- After updating DNS records, allow some time for changes to propagate.
- Test the SSL connection to ensure that the domain is resolving correctly to the server’s IP address.
b. Update DNS Records if Necessary:
- Identify records requiring updates:
- Identify the DNS records that need to be updated. This may include A records, AAAA records, CNAME records, or other relevant records.
- Edit DNS records with correct information:
- Edit the DNS records with the correct information, including the IP address or hostname of the server where your website is hosted.
- Verify changes and wait for DNS propagation:
- Double-check the changes made to the DNS records.
- Be aware that DNS changes might take some time to propagate across the internet. This propagation period varies but can typically take a few hours to 48 hours.
- Test SSL connection for resolution:
- Once DNS propagation is complete, test the SSL connection to ensure that the domain resolves to the correct server.
- Use online tools or browser extensions to verify SSL certificate details for your domain.
STEP 5. Ensure Server Resources:
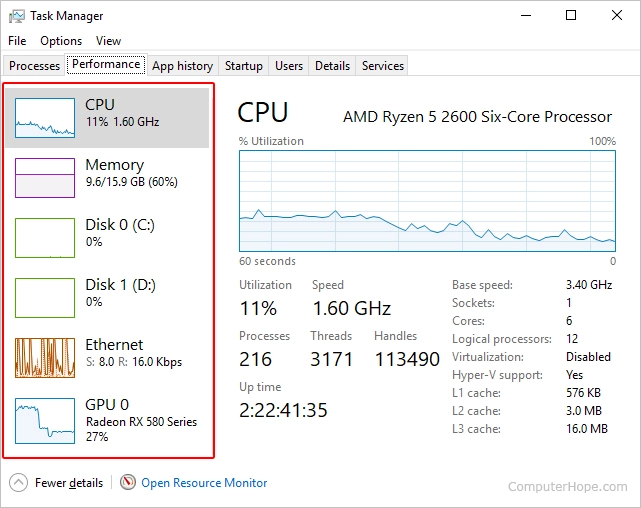
a. Check CPU and Memory Resources:
- Access server monitoring tools:
- Use server monitoring tools like
top,htop, or specialized monitoring solutions (e.g., Nagios, Prometheus) to analyze server performance.
- Use server monitoring tools like
- Review CPU and memory usage:
- Examine the current CPU and memory utilization on the server.
- Identify any spikes or consistently high usage that may impact performance.
- Identify resource-hungry processes:
- Identify processes that consume significant CPU or memory resources.
- Use tools like
psorhtopto pinpoint resource-intensive processes.
- Optimize or upgrade applications as needed:
- Optimize the configuration of resource-intensive applications.
- Consider upgrading or optimizing databases, web servers, or other components affecting server performance.
- Upgrade server resources if shortages persist:
- If CPU or memory shortages persist, consider upgrading your server’s resources.
- This may involve upgrading to a higher-tier hosting plan, adding more RAM, or upgrading the CPU.
b. Monitor Resource Trends:
- Implement continuous resource monitoring:
- Set up continuous monitoring to track server resource usage over time.
- Use monitoring solutions that provide historical data to identify trends.
- Set up alerts for critical thresholds:
- Establish alerts for critical resource thresholds. For example, set alerts for high CPU or memory usage.
- Notifications will help you proactively address potential resource issues.
- Test SSL connections after optimization:
- After optimizing server resources, test SSL connections to ensure that the changes have positively impacted performance.
- Use tools to simulate SSL traffic or monitor real-time SSL connections during peak usage periods.
Step 6: Check and Monitor Logs
a. Examine Detailed Error Messages:

- Log in to the server or hosting provider’s control panel:
- Access the control panel provided by your hosting provider or log in directly to your server.
- Navigate to log files, focusing on SSL-related entries:
- Locate the log files that contain information about your web server’s activities. Common locations include
/var/logfor Linux servers or specific folders within your hosting control panel. - Focus on log entries related to SSL or HTTPS.
- Locate the log files that contain information about your web server’s activities. Common locations include
- Check timestamps and understand error messages:
- Examine the timestamps of log entries to identify when issues occurred.
- Understand the error messages, warnings, or informational entries related to SSL connections.
- Pay attention to any specific error codes or messages that indicate the nature of the problem.
b. Use Log Information for Resolution:
- Identify root causes based on log insights:
- Analyze the log information to identify the root causes of SSL-related issues.
- Look for patterns or recurring errors that may point to specific problems.
- Search for specific error codes:
- Use the error codes or messages found in the logs to perform targeted searches.
- Consult documentation related to your web server software, SSL libraries, or applications to understand the meaning of specific error codes.
- Implement solutions and update configurations:
- Based on the identified issues, implement solutions to address the root causes.
- Update server configurations, SSL settings, or application configurations as necessary.
- This may involve adjusting SSL protocols, cipher suites, or resolving issues with SSL certificate configurations.
- Test SSL connections and establish regular log checks:
- After implementing solutions, test SSL connections to ensure that the issues have been resolved.
- Establish a routine for regular log checks to proactively identify and address any new issues that may arise.
Conclusion:
In conclusion, navigating the intricate realm of web technologies often involves grappling with challenges like the elusive HTTP 529 error. This comprehensive guide equips web administrators with the knowledge and step-by-step solutions to efficiently address the complexities of error code 529. Understanding its origins, implications, and implementing scalable solutions is essential for maintaining a robust online presence.
As you embark on this enlightening journey, armed with insights for seamless troubleshooting, error code 529 will no longer be an insurmountable hurdle. By delving into the intricacies of SSL certificates, server configurations, firewall settings, DNS accuracy, resource optimization, and vigilant log monitoring, you fortify your web infrastructure against the strain of overloaded services. Embrace the tools provided in this guide to enhance your web presence, ensuring a resilient and reliable digital experience for users.