

When encountering the Cloudflare Error 522 Connection Timeout, you may feel overwhelmed, but rest assured, you’re not alone. Many website owners and administrators have grappled with this issue. It can be a frustrating experience, disrupting the seamless user experience you aim to provide your visitors.
In this comprehensive guide, our goal is to offer clear and practical solutions for addressing the “connection timed out error code 522.” We recognize the pivotal role your website plays in your online presence, making its smooth operation essential. Therefore, our expert solutions are meticulously crafted to lead you through the process of resolving this challenge with ease.
Ultimately, this article equips you with the knowledge and insights necessary to conquer the Cloudflare Error 522 Connection Timeout, ensuring your website runs smoothly and provides an excellent user experience for your audience.
Contents
- 1 Understanding Connection Timed Out Error Code 522
- 2 Common Causes of Error 522
- 3 How to Fix Cloudflare Error 522 Connection Timeout
Understanding Connection Timed Out Error Code 522
Cloudflare Error 522 occurs when Cloudflare, a popular content delivery network, is unable to establish a TCP handshake with the origin server. This means that the request to load a webpage times out.
The Role of The Origin Server
The origin server is where your website’s resources are hosted. If there’s an issue with this server, such as it being down or overloaded, Cloudflare can’t fetch the necessary data, resulting in a Connection Timeout error.

Common Causes of Error 522
. Server Downtime:
The origin server might be temporarily down due to maintenance or technical issues.
. Server Overload:
A sudden spike in traffic can overwhelm the server’s capacity.
. Firewall Restrictions:
Overly strict firewall rules can block Cloudflare’s requests.
. Incorrect DNS Settings:
Misconfigured DNS settings can cause routing problems.
At a Glance:
| Error Code | Error Type | Error Variation | Error Causes |
| Error 522 | Server Error | Connection Timed Out | – The server has reached its maximum limit. |
| – The firewall has blocked a Cloudflare IP address. | |||
| – Incorrect IP address. | |||
| – KeepAlive disabled. |
“connection timed-out error code 522” is classified as a server error, specifically, a connection timed-out error. It can occur due to multiple causes, including the server reaching its maximum capacity, a firewall blocking a Cloudflare IP address, incorrect IP settings, or if KeepAlive is disabled. Each of these issues may lead to a 522 error, affecting the proper functioning of your website. facing an error 525 go read
How to Fix Cloudflare Error 522 Connection Timeout
Now that you understand the basics of this error, let’s delve into the solutions to fix it.
1. Check the Origin Server
First and foremost, check the status of your origin server. Confirm that it is operational and running smoothly. If you find that it’s down or facing any issues, it’s crucial to address the problem promptly. The performance of your website depends on the reliability of the origin server, so ensuring it’s in good working condition is the initial step toward resolving the Cloudflare Error 522 Connection Timeout and maintaining a seamless user experience.
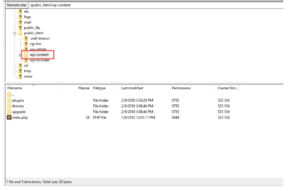
Step 1: stepAccess Your Origin Server: Begin by accessing the origin server where your website’s content is hosted. You can do this through a secure connection to the server, often using remote access tools or a control panel provided by your hosting provider
Step 2: Verify Operational Status: Once you’ve accessed the server, verify its operational status. Ensure that it’s up and running as it should be. This involves checking if the server hardware is powered on, all services are operational, and there are no hardware or software issues that might be affecting its performance.
Step 3: Check for Error Messages: While inspecting the server, be on the lookout for any error messages or alerts. These messages can provide insights into any issues the server might be facing. Address any identified errors or issues as needed.
Step 4: Review Server Resources: Examine the server’s resource usage, including CPU, memory, and disk space. If the server is under heavy load or running out of resources, it could contribute to the timeout issue. Take steps to optimize resource usage if necessary.
Step 5: Test Network Connectivity: Ensure that the server has a stable and uninterrupted network connection. Test its connectivity to the internet to confirm there are no network issues, such as dropped connections or high latency.
Step 6: Contact Your Hosting Provider: If you encounter any problems during this inspection and are unable to resolve them on your own, it’s advisable to reach out to your hosting provider’s support team for assistance. They can provide insights, and diagnostics, and potentially address server-related issues promptly.
Step 7:Regular Server Maintenance: To prevent future occurrences of Error 522, implement a schedule for regular server maintenance and monitoring. This can help you proactively identify and address potential issues before they impact your website’s performance
2. Monitor Server Load
Continuously monitor your server’s resource utilization to maintain optimal performance. If you observe a persistent overload, it’s advisable to contemplate upgrading your hosting plan. Vigilance in resource management is key to preventing the “connection timed out error code 522”. An overloaded server can impede the swift delivery of content and disrupt user experiences. Upgrading your hosting plan, when necessary, ensures your website can efficiently handle increased traffic and resource demands, mitigating the risk of this error and enhancing the overall functionality of your site.
Step 1:Resource Monitoring Tools: Use server monitoring tools and software to continuously track the resource utilization of your server. These tools can provide real-time insights into metrics such as CPU usage, memory, disk space, and network traffic.
Step 2:Set Thresholds: Establish resource usage thresholds based on historical data and the capacity of your server. This allows you to define acceptable resource levels and identifies when you are approaching critical limits.

Step 3:Regular Analysis: Regularly analyze the data provided by your monitoring tools. Look for patterns or trends in resource consumption. This helps in identifying if there are consistent periods of resource overload.
Step 4:Address Resource Spikes: If you notice occasional spikes in resource utilization, investigate the cause. It could be due to unexpected traffic surges or resource-intensive processes. Ensure that your server can handle these spikes without causing timeouts.
Step 5:Plan for Scalability: Have a scalability plan in place. If resource utilization consistently approaches or exceeds the defined thresholds, it’s time to consider upgrading your hosting plan. Consult with your hosting provider to determine the most suitable upgrade options.
Step 6:Server Optimization: Implement server optimization techniques to improve resource efficiency. This might involve optimizing website code, using caching mechanisms, or offloading resource-heavy tasks to external services.

Step 7:Regular Server Maintenance: Schedule routine server maintenance to keep software and configurations up to date. Outdated software can lead to inefficiencies and potential resource bottlenecks.
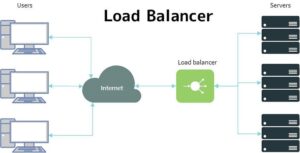
Step 8:Testing and Load Balancing: If your website experiences periodic traffic surges, consider load balancing solutions to distribute the load evenly across multiple servers. This can help prevent resource overloads during peak traffic.
Step 9:Consult Hosting Provider: Engage with your hosting provider for guidance on resource management and potential upgrades. They can provide valuable insights and solutions to optimize server performance.
Step 10:Proactive Approach: The key to preventing Error 522 is a proactive approach to resource management. Regularly assess your server’s performance, adapt to changing demands, and be prepared to scale resources as needed to ensure a smooth user experience.
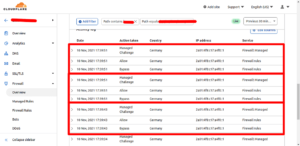
3. Review Firewall Rules
Review your firewall settings with meticulous attention. It’s imperative to ensure that Cloudflare’s IP ranges are not inadvertently blocked. This precautionary measure is crucial in preventing the Cloudflare Error 522 Connection Timeout. If Cloudflare’s IP ranges are blocked, it can hinder the network’s ability to establish a connection with your origin server, leading to this error. By verifying and adjusting your firewall settings to allow Cloudflare’s IP ranges, you can significantly reduce the chances of encountering this issue and maintain the seamless operation of your website
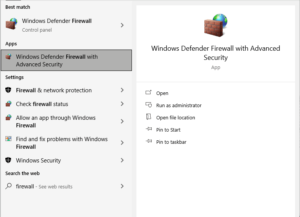
Step 1: Access Firewall Settings: Log in to your server’s control panel or the interface provided by your hosting provider to access your firewall settings.
Step 2: Examine Existing Rules: Carefully review your current firewall rules. Look for any rules that may block or restrict incoming traffic, and pay close attention to IP range restrictions.
Step 3: Check for Cloudflare’s IP Ranges: Ensure that Cloudflare’s IP ranges are not included in any blocked or restricted lists. Cloudflare provides a list of their IP ranges on their website or through their support documentation. Verify that these ranges are not set to be blocked by your firewall.
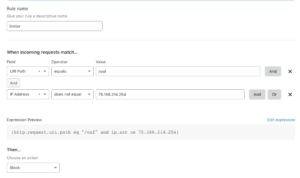
Step 4: Adjust Rules if Necessary: If you find that Cloudflare’s IP ranges are blocked or restricted, make the necessary adjustments in your firewall settings. This typically involves editing or deleting the rule that is causing the block.
Step 5: Regularly Update Rules: Keep your firewall rules up to date. Cloudflare’s IP ranges may change over time, so it’s important to periodically check for updates and ensure that your firewall rules reflect the latest information.
Step 6: Test Connectivity: After making adjustments, test the connectivity between Cloudflare and your origin server. This can involve using network tools or Cloudflare’s diagnostic tools to verify that the connection is established without issues.
Step 7: Document Changes: Maintain a record of any changes made to your firewall settings. This documentation can be valuable for future reference and troubleshooting.
Step 8: Consult with Cloudflare Support: If you encounter challenges while adjusting your firewall rules, consider reaching out to Cloudflare’s support team. They can provide guidance and assistance in ensuring that Cloudflare’s IP ranges are correctly configured.
Step 9: Regularly Monitor and Audit: Implement a schedule for periodic monitoring and auditing of your firewall settings. This ongoing vigilance helps maintain an effective security and accessibility balance.
4. Verify DNS Settings
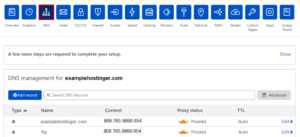
It’s essential to conduct a thorough review of your DNS (Domain Name System) settings to confirm their accurate configuration. Incorrect DNS settings are a known culprit for routing issues, potentially leading to the Cloudflare Error 522 Connection Timeout. Accurate DNS settings are crucial in ensuring that web traffic is efficiently directed to your origin server. Inaccuracies can disrupt this process, causing the error to occur. By double-checking and rectifying any misconfigurations in your DNS settings, you take a significant step toward resolving this issue and maintaining a smoothly functioning website.
Step 1: Access DNS Settings
Begin by accessing your DNS settings, typically through your hosting provider’s control panel or domain registrar’s dashboard. Ensure you have the necessary login credentials.
Step 2: Review DNS Records
Thoroughly review your DNS records, including A, CNAME, and MX records, to confirm their accuracy. Pay special attention to any records related to your website and its subdomains.
Step 3: Confirm Cloudflare Integration
Ensure that Cloudflare is correctly integrated with your DNS settings. This typically involves pointing your domain’s nameservers to Cloudflare’s nameservers, as per Cloudflare’s instructions.
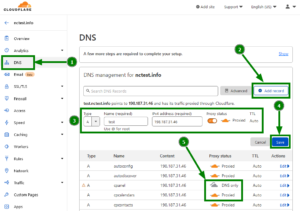
Step 4: Verify IP Address
Double-check that the DNS records accurately point to the IP address of your origin server. Any discrepancies can lead to routing issues, resulting in the Error 522.
Step 5: Resolve Misconfigurations
If you identify any misconfigurations or inaccuracies in your DNS settings, rectify them promptly. Update records, correct nameserver information, and ensure that the DNS settings align with Cloudflare’s recommendations.
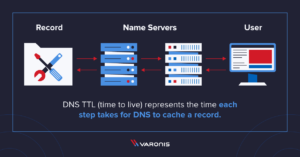
Step 6: Check TTL (Time to Live)
Review the TTL settings to ensure they are appropriately configured. TTL affects how quickly DNS changes propagate. Adjust if necessary, but be cautious with very low values, as they can strain DNS servers.
Step 7: Monitor DNS Changes
Keep an eye on any changes you make to your DNS settings. DNS updates can take some time to propagate across the internet, so monitor the process and test your website’s accessibility.

Step 8: Seek Expert Assistance
If you’re unsure about DNS configurations or encounter challenges during this process, consult with your hosting provider’s support or a DNS expert for guidance and assistance.
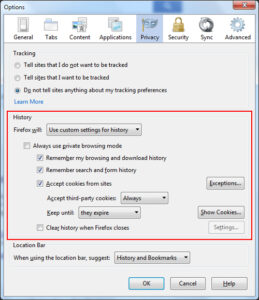
5. Disable Security Plugins
In certain instances, security plugins employed on your website may inadvertently trigger the Cloudflare Error 522. To diagnose this issue, consider temporarily disabling these plugins. By doing so, you can determine whether they are the root cause of the error. Security plugins, while vital for protecting your website, can sometimes interfere with the connection between Cloudflare and your origin server. Temporarily deactivating them as a troubleshooting step allows you to pinpoint the issue and subsequently reconfigure your security settings to ensure they function without triggering this error.
Step 1: Log in to Your Website’s Dashboard
Access your website’s dashboard or content management system (e.g., WordPress, Joomla, etc.) using your admin credentials.
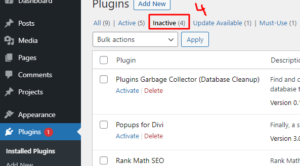
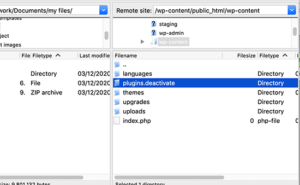
Step 2: Navigate to the Plugin Section
Within your dashboard, locate the section that lists the installed plugins. This is typically found in the main menu or sidebar.
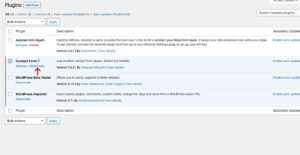
Step 3: Identify Security Plugins
In the list of plugins, identify the security plugins that are currently active on your website. These are the plugins responsible for safeguarding your site.
Step 4: Deactivate Security Plugins
Carefully select the security plugins you want to temporarily deactivate. This action typically involves clicking on the plugin name and selecting the “Deactivate” option. Most content management systems offer a straightforward way to disable plugins.
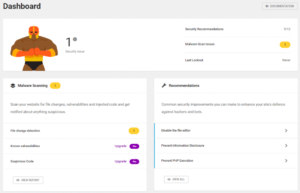
Step 5: Test Website Functionality
After deactivating the security plugins, visit your website to test its functionality. This step is crucial as it helps you determine whether the Cloudflare Error 522 persists without the security plugins in operation.
Step 6: Observe for Error Resolution
While testing your website, observe if Error 522 has been resolved. If the error no longer occurs, it indicates that one or more of the security plugins were causing the issue.
Step 7: Identify the Problematic Plugin
To pinpoint the specific plugin causing the problem, reactivate the security plugins one at a time and test your website after reactivating each one. This process will help you identify the problematic plugin.
Step 8: Reconfigure Security Settings
Once you’ve identified the problematic security plugin, access its settings and configurations. Ensure that the plugin is not interfering with the connection between Cloudflare and your origin server. Reconfigure the security settings as needed to prevent Error 522.
Step 9: Regularly Monitor
After reconfiguring the security plugin, closely monitor your website’s performance and security. Regularly check for any recurring Error 522 issues and make adjustments if necessary.
Step 10: Seek Expert Advice
If you encounter challenges during this process or are unsure about reconfiguring security settings, consider seeking assistance from the plugin’s support team or a web development expert
6. Contact Your Hosting Provider
If you’ve diligently followed the preceding solutions and the Cloudflare Error 522 still persists, it’s time to seek professional help. Contact your hosting provider for further assistance. Hosting providers possess expertise in server management and configuration, making them well-equipped to address persistent issues. They can investigate the problem at a deeper level, identifying and resolving underlying causes that might not be apparent to you. Don’t hesitate to reach out; your hosting provider’s support team can provide the necessary expertise and guidance to ensure your website’s smooth operation and a swift resolution of the Cloudflare Error 522 Connection Timeout.
Step 1: Log in to Your Website’s Dashboard
Access your website’s dashboard or content management system (e.g., WordPress, Joomla, etc.) using your admin credentials.
Step 2: Navigate to the Plugin Section
Within your dashboard, locate the section that lists the installed plugins. This is typically found in the main menu or sidebar.
Step 3: Identify Security Plugins
In the list of plugins, identify the security plugins that are currently active on your website. These are the plugins responsible for safeguarding your site.
Step 4: Deactivate Security Plugins
Carefully select the security plugins you want to temporarily deactivate. This action typically involves clicking on the plugin name and selecting the “Deactivate” option. Most content management systems offer a straightforward way to disable plugins.
Step 5: Test Website Functionality
After deactivating the security plugins, visit your website to test its functionality. This step is crucial as it helps you determine whether the Cloudflare Error 522 persists without the security plugins in operation.

Step 6: Observe for Error Resolution
While testing your website, observe if Error 522 has been resolved. If the error no longer occurs, it indicates that one or more of the security plugins were causing the issue.
Step 7: Identify the Problematic Plugin
To pinpoint the specific plugin causing the problem, reactivate the security plugins one at a time and test your website after reactivating each one. This process will help you identify the problematic plugin.
Step 8: Reconfigure Security Settings
Once you’ve identified the problematic security plugin, access its settings and configurations. Ensure that the plugin is not interfering with the connection between Cloudflare and your origin server. Reconfigure the security settings as needed to prevent Error 522.
Step 9: Regularly Monitor
After reconfiguring the security plugin, closely monitor your website’s performance and security. Regularly check for any recurring Error 522 issues and make adjustments if necessary.
Step 10: Seek Expert Advice
If you encounter challenges during this process or are unsure about reconfiguring security settings, consider seeking assistance from the plugin’s support team or a web development expert.
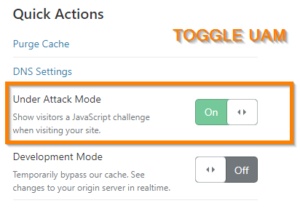
7. Review Configuration and Activate “Under Attack” Mode

Perform a thorough review of your Cloudflare configuration to ensure it’s set up correctly and not causing the 522 error. This includes checking DNS, SSL, and firewall settings, as well as confirming that the origin server is configured appropriately and responsive to HTTP requests. If issues persist, consider activating Cloudflare’s “Under Attack” mode, which provides enhanced protection against DDoS attacks, effectively mitigating the” connection timed-out error code 522″ by blocking malicious traffic from reaching the origin server and reducing response times. If the problem persists, you can contact Cloudflare Support through support tickets, available for all users, or via the Live chat option, exclusively for Business and Enterprise accounts.
Step 1: Access Your Cloudflare Account
Log in to your Cloudflare account using your credentials. If you don’t have an account, you’ll need to sign up for one.
Step 2: Review Configuration Settings
Within your Cloudflare dashboard, navigate to the configuration settings. This includes sections for DNS, SSL, and firewall settings. Review each of these settings carefully.

Step 3: Verify DNS Settings
Ensure that your DNS settings are correctly configured. Confirm that your domain is pointing to the correct IP address and that there are no discrepancies in the DNS records.
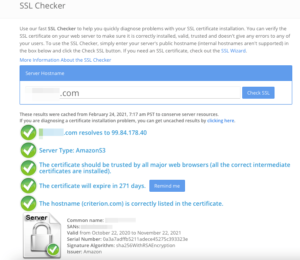
Step 4: Check SSL Configuration
Verify that your SSL configuration is correct. Ensure that your SSL certificate is active and hasn’t expired. SSL issues can sometimes trigger the 522 error.
Step 5: Review Firewall Settings
Meticulously review your firewall settings. Confirm that Cloudflare’s IP ranges are not inadvertently blocked. Adjust firewall rules to allow Cloudflare’s IP ranges if needed.
Step 6: Confirm Origin Server Configuration
Check that your origin server is appropriately configured and responsive to HTTP requests. Ensure there are no issues on the server’s end.
Step 7: Activate “Under Attack” Mode
If the 522 error persists and you suspect a DDoS attack or heavy traffic, consider activating Cloudflare’s “Under Attack” mode. This provides enhanced protection against malicious traffic. Locate this option in your Cloudflare dashboard and enable it.
Step 8: Monitor for Error Resolution
After activating “Under Attack” mode or making any configuration changes, monitor your website for the resolution of the 522 error. This mode should help mitigate attacks and reduce response times.
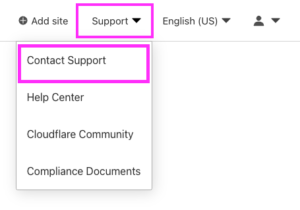
Step 9: Contact Cloudflare Support
If the problem still persists, reach out to Cloudflare Support. You can do this by submitting a support ticket, which is available to all users, or by using the live chat option, which is exclusively for Business and Enterprise accounts.
Step 10: Provide Details
When contacting Cloudflare Support, provide them with details about the issue, the steps you’ve taken, and the fact that you’ve activated “Under Attack” mode. This information will help them assist you effectively.
Step 11: Cooperate with Cloudflare Support
Cooperate with Cloudflare’s support team as they investigate the issue. They may request additional information or access to your Cloudflare configuration.
FAQs
Q: Can I fix Error 522 on my own?
A: Yes, many times you can fix it by following the steps mentioned in this article.
Q: Why does my server get overloaded?
A: A sudden influx of visitors or resource-intensive scripts can overload your server.
Q: How can I check if my server is down?
A: Try accessing your website directly. If it doesn’t load, your server might be down.
Q: Are there any tools to diagnose Error 522?
A: Yes, Cloudflare offers diagnostic tools to help identify and fix the issue
Q: What should I do if my DNS settings are incorrect?
A: Contact your hosting provider or domain registrar for guidance on correcting DNS settings.
Q: Should I always disable security plugins?
A: No, only disable them temporarily for troubleshooting. Re-enable them once the issue is resolved.
CONCLUSION
Resolving Cloudflare Error 522 Connection Timeout is essential to maintain a seamless user experience on your website. By following the steps outlined in this article, you can quickly diagnose and fix this error, ensuring that your site runs smoothly.
Remember, technical issues can happen to any website, but with the right knowledge and steps, you can overcome them. Don’t let Error 522 deter you; instead, use it as an opportunity to enhance your web management skills.