

Picture this: you’ve put your heart and soul into creating an amazing website, only to be greeted by the unwelcome guest known as Cloudflare Error 523. It’s frustrating, it’s disruptive, and it can leave your site in limbo. But fear not, for we’re here to guide you through this storm and help you restore your website’s shine. In this comprehensive guide, we’ll not only unravel the mysteries of Cloudflare Error 523 but also provide you with expert advice and creative solutions to make your website run as smoothly as a well-oiled machine.
Contents
- 1 What is Error 523 and It Causes?
- 1.1 How to Fix Cloudflare Error 523 – 6 Quick Methods
- 1.2 Conclusion
- 1.3 FAQs (Frequently Asked Questions)
- 1.3.1 What is Cloudflare Error 523?
- 1.3.2 How can I check if my origin server is running?
- 1.3.3 Why do DNS settings matter in resolving Error Code 523?
- 1.3.4 What should I do if my SSL certificate has expired?
- 1.3.5 How can I adjust Cloudflare firewall settings to prevent Error 523?
- 1.3.6 What should I do if I suspect network connectivity issues?
What is Error 523 and It Causes?
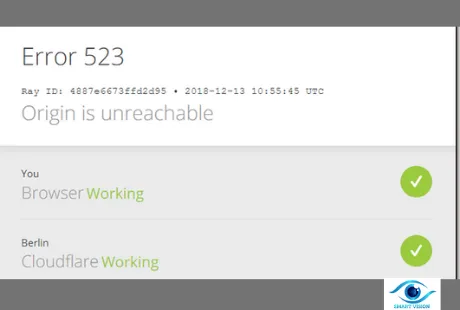
Error 523, often referred to as “Origin Is Unreachable” is a comprehensive challenge in the realm of web connectivity. It arises when Cloudflare encounters an impediment in establishing a connection with your web server. The causes of this error are diverse, ranging from misconfigured DNS settings that redirect the traffic incorrectly, to server issues such as misconfigurations or outages, and even network interruptions.
Understanding and resolving Error 523 is essential for maintaining a seamless online presence. To assist you in effectively addressing this issue, we’ve thoughtfully structured this guide into distinct sections. Each section is meticulously crafted to delve into the root causes, offering practical solutions and guidance for rectifying the problem. By following this structured approach, you’ll gain a comprehensive understanding of Error code 523 and the knowledge needed to tackle it head-on, ensuring that your website remains accessible and reliable.
How to Fix Cloudflare Error 523 – 6 Quick Methods
Within this section, we’ll delve into the fundamental procedures for rectifying Cloudflare Error 523. By meticulously adhering to these guidelines, you can effectively reinstate your website’s optimal functionality. These crucial steps serve as your roadmap to a swift and efficient resolution of the error, ensuring that your website remains accessible and responsive.
1. Check Your Origin Server
-
- Access Your Origin Server: Log in to your web hosting account or access your origin server if you manage it directly. You’ll need access to the server settings and logs.
- Check for Server Outages: Begin by checking whether your server is experiencing any outages. Server outages can be caused by a variety of factors, including network issues, power failures, or hardware problems.
- Look for any notifications from your hosting provider or data center indicating server downtime.
- If you have physical access to the server, make sure it’s powered on and connected to the network.
- Verify Server Maintenance: Sometimes, your hosting provider may schedule maintenance activities that can temporarily disrupt your website. Check if there’s any ongoing maintenance.
- Look for maintenance notifications on your hosting provider’s website or in your account dashboard.
- If you manage the server yourself, ensure that no maintenance tasks are running, such as software updates or server reboots.
- Check Server Health: Examine the health of your server, including its resource usage and performance. High server load, memory issues, or CPU spikes can cause connectivity problems.
- Review server monitoring tools or logs to assess resource utilization.
- Consider using command-line tools like
top(Linux) or the Task Manager (Windows) to monitor CPU and memory usage.
- Review Server Logs: Inspect server logs for any error messages or issues. Server logs can provide valuable information about what’s going wrong.
- Access your server’s error logs, which are often located in directories like
/var/log(Linux) or in your hosting control panel. - Look for any error messages related to your web server software (e.g., Apache, Nginx) or the application running on it.
- Access your server’s error logs, which are often located in directories like
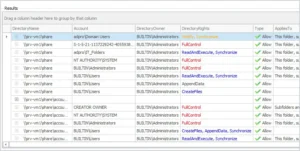
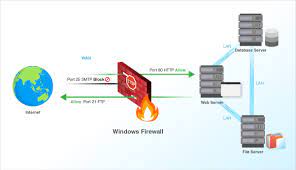
- Check Firewall and Security Rules: Ensure that firewall rules and security settings aren’t blocking incoming connections to your web server. Misconfigured security settings can lead to Error 523.
- Review firewall rules on your server or hosting account to make sure they allow traffic on the necessary ports (usually port 80 for HTTP or port 443 for HTTPS).
- Verify that IP blocking or security plugins aren’t causing connectivity issues.
- Restart Your Web Server: If you find no specific issues in the logs and your server health appears normal, try restarting your web server software. This can resolve minor connectivity problems.
- Use commands like
systemctl restart apache2(for Apache) orsystemctl restart nginx(for Nginx) on Linux, or restart your web server software through your hosting control panel.
- Use commands like
- Contact Hosting Provider (if applicable): If you’re using a web hosting service, and you can’t identify or fix the issue on your own, contact your hosting provider’s support team. Provide them with the details of your investigation so far.
- Clear Cloudflare Cache (optional): If you use Cloudflare’s caching, you may want to clear your cache to ensure that cached content is not causing the problem. This step is optional and may not always be necessary.
- Log in to your Cloudflare account and go to the caching settings to clear your cache.
- Recheck Cloudflare Settings: Verify that your Cloudflare settings are correctly configured. Make sure your DNS records are accurate and pointing to the right IP address of your origin server.
- Wait for DNS Propagation (if changes were made): If you made any changes to your DNS settings, be aware that DNS propagation can take some time. It might take a few hours for the changes to take effect globally.
- Test Your Website: After addressing the server issues and verifying your Cloudflare settings, test your website to see if Error 523 is resolved. Access it through a web browser to ensure it’s functioning as expected.
You Might Also Like, Steps to Process Sign Up
2. Verify DNS Settings
Verifying and ensuring the accuracy of your DNS settings is crucial in resolving Cloudflare Error 523. The DNS settings are a critical component in the connection between Cloudflare and your origin server. Here’s a step-by-step guide to help you review and correct your DNS settings within Cloudflare:
- Log in to your Cloudflare Account: Start by logging in to your Cloudflare account. If you’re not already using Cloudflare, you will need to sign up for an account and add your domain to Cloudflare.
- Select the Domain: In your Cloudflare dashboard, select the domain for which you’re experiencing Error 523. Click on the domain name to access its settings.
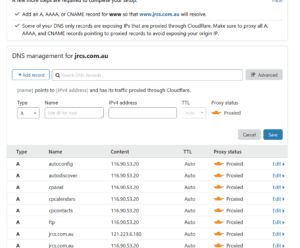
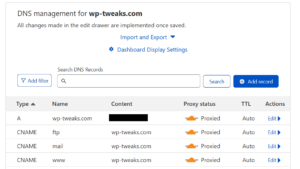
- Review DNS Records: The DNS settings are primarily managed through the DNS Records section. You should see a list of DNS records associated with your domain. check out this blog How To Fix SSL Handshake Failed Error Code 525: A Comprehensive Guide
- Check IP Addresses: For each DNS record, verify that the IP address specified in the record matches the IP address of your origin server. This IP address is where Cloudflare should route incoming web traffic.
- Common DNS records include A records, CNAME records, and MX records. Make sure that A records pointing to your domain have the correct IP address.
- Remove Redundant Records: Eliminate any duplicate or redundant DNS records. Redundant records can cause conflicts and misdirection of traffic.
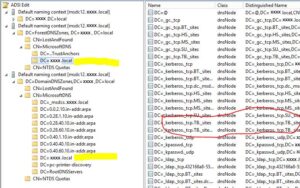
- Ensure Name Server Settings: Verify that your domain is using Cloudflare’s authoritative name servers. Cloudflare assigns you two name servers, and your domain registrar should be configured to use these Cloudflare name servers.
- This information is usually found in your domain registrar’s dashboard. Check that the name server settings match what Cloudflare provides.
- Check DNSSEC (if enabled): If you’ve enabled DNSSEC (DNS Security Extensions) for your domain, ensure that it’s configured correctly and keys are up to date.
- Pause Cloudflare (if necessary): In some cases, especially during troubleshooting, you might want to temporarily pause Cloudflare to see if the issue is resolved. You can do this by navigating to the Overview section in your Cloudflare dashboard and clicking on “Pause.”
- Update DNS Records (if needed): If you’ve made changes to your DNS records, make sure to update them within your domain registrar’s settings. The changes you make in Cloudflare must also match your registrar’s records.
- Check for DNS Propagation: DNS changes may take some time to propagate globally. Be patient and allow up to 48 hours for the changes to take effect. During this time, test your website periodically to see if the Error 523 is resolved.
- Revert Paused Status (if applicable): If you paused Cloudflare earlier, don’t forget to resume it after you’ve confirmed that the DNS settings are correct and the issue is resolved.
- Test Your Website: After making DNS adjustments and confirming their correctness, test your website by accessing it through a web browser. Ensure that it loads correctly without Error 523.
3. Investigate Hosting Provider Issues
When you encounter Cloudflare Error 523, it’s important to consider the possibility of server-related issues that might be causing the problem. In such cases, your hosting provider plays a crucial role in diagnosing and resolving these server-related complications. Here’s a step-by-step guide on how to investigate hosting provider issues to address Error 523:
- Gather Hosting Provider Information: Collect all relevant information about your hosting provider, including their contact details, customer support email, phone number, and account credentials if required.
- Confirm Server Status: Before reaching out to your hosting provider, double-check if there are any known server outages or maintenance notifications on your hosting provider’s website or in your account dashboard. Sometimes, the hosting provider is already aware of issues and might have updates posted.
- Contact Hosting Provider Support: If you can’t find any information regarding server issues or maintenance, it’s time to contact your hosting provider’s customer support. You can do this through email, phone, or their support ticket system, depending on their preferred method of communication.

- Provide Detailed Information: When reaching out to your hosting provider, be prepared to provide detailed information about your issue. Include the following:
- Your domain name.
- A description of the Error 523 issue you’re experiencing.
- Any troubleshooting steps you’ve taken so far?
- Server logs or error messages, if available.
- Information about your server configuration and any recent changes.
- Ask for a Server Check: Request that your hosting provider perform a server check to ensure that the server is functioning correctly. They may examine server health, resource usage, and configurations to identify and fix any issues.
- Inquire About Server Configurations: Ask the hosting provider to review your server configurations, especially if you’ve made any recent changes. Misconfigurations in server settings can lead to Error 523.
- Request DNS Configuration Verification: Verify with your hosting provider that the DNS settings are correctly configured to point to your server’s IP address. Ensure that your domain is correctly associated with your hosting account.
- Check Firewall and Security Rules: Ask your hosting provider to review and verify firewall and security rules to ensure they are not blocking incoming connections to your web server.
- Monitor Server Uptime: If your hosting provider identifies any server outages or issues, request that they provide you with updates on the resolution progress and an estimate of when the server will be back online.
- Test Your Website: While you’re waiting for your hosting provider to investigate and address the issues, continue to test your website to see if Error 523 is resolved once they’ve made any necessary changes.
- Follow-Up and Documentation: Keep a record of your communication with your hosting provider. This documentation can be useful for reference and for future troubleshooting. Follow up with them if necessary to ensure that the issue is completely resolved.
4. SSL Certificate Validity
Ensuring the validity of your SSL certificate is essential for maintaining the security and accessibility of your website and preventing Cloudflare Error 523. SSL certificates are critical for encrypting data transmitted between your web server and visitors’ browsers. When an SSL certificate expires, it can cause security warnings and connection issues. Here’s a step-by-step guide on how to check and renew your SSL certificate:
- Identify Your SSL Certificate Provider: Determine which company or entity issued your SSL certificate. It could be a commercial certificate authority (CA) like Let’s Encrypt, Comodo, or DigiCert, or you might have obtained it from your hosting provider.
- Check SSL Certificate Expiry Date: To check the validity of your SSL certificate, you’ll need to find the certificate’s expiration date. You can often do this through your web hosting control panel, SSL certificate management dashboard, or by examining your server’s configuration.
- In the hosting control panel or SSL certificate management dashboard, locate your SSL certificate and view its details, which should include the expiration date.
- Set Up Expiry Notifications: To avoid future certificate expiry issues, configure notifications or alerts that will inform you in advance of the certificate’s impending expiration. Many SSL certificate providers offer this service.
- Renew SSL Certificate: If your SSL certificate is close to expiring or has already expired, it’s crucial to renew it promptly. The renewal process varies depending on your certificate provider:
- Commercial CA: Log in to your account on the certificate provider’s website, navigate to your SSL certificate, and follow their instructions for renewal. You may need to generate a new certificate signing request (CSR) and complete domain validation again.
- Let’s Encrypt: If you’re using Let’s Encrypt, you can renew the certificate using automated tools like Certbot. Run the appropriate command to renew your certificate, typically
certbot renew.
- Download or Reissue the Certificate: After successfully renewing your SSL certificate, download the renewed certificate files or follow the certificate provider’s instructions to reissue the certificate.
- Update Your Web Server: Once you have the renewed certificate, you need to update your web server’s configuration to use the new certificate files. This process depends on your web server software (e.g., Apache, Nginx, IIS).
- Replace the old SSL certificate files with the new ones in your server’s configuration.
- Restart your web server to apply the changes.
- Update Cloudflare SSL Settings: If you’re using Cloudflare for SSL, ensure that your SSL settings within Cloudflare are updated to reflect the new SSL certificate. This typically involves uploading the renewed SSL certificate through the Cloudflare dashboard.
- Check for Mixed Content: After updating your SSL certificate, ensure that your website does not have any mixed content issues. Mixed content occurs when secure (HTTPS) and non-secure (HTTP) elements are loaded together on a web page. This can cause security warnings. Tools like WhyNoPadlock or the browser’s developer console can help identify mixed content issues.
- Test Your Website: After completing these steps, thoroughly test your website by accessing it through a web browser to ensure that the SSL certificate has been renewed correctly and that Error 523 is resolved.
5. Cloudflare Firewall Configuration
Reviewing and fine-tuning your Cloudflare firewall settings is crucial for maintaining the security and accessibility of your website while preventing Cloudflare Error 523. Firewalls are essential for protecting your website from malicious traffic, but overly strict rules can sometimes block legitimate requests. Here’s a step-by-step guide on how to adjust your Cloudflare firewall settings:
- Log in to Your Cloudflare Account: Start by logging in to your Cloudflare account.
- Select Your Domain: In your Cloudflare dashboard, select the domain for which you want to review and adjust firewall settings. Click on the domain name to access its settings.
- Access the Firewall Section: Navigate to the “Firewall” section in the Cloudflare dashboard. This is where you can manage your firewall rules.
- Review Current Firewall Rules: Examine the existing firewall rules to understand which rules might be too restrictive. Firewall rules are designed to block or challenge traffic based on certain criteria, such as IP address, country, or security threats.
- Identify and Adjust Overly Restrictive Rules: Look for firewall rules that might be too stringent. These could include rules that block traffic from entire countries, IP addresses, or specific user agents. Review these rules and determine if they are unnecessarily preventing legitimate traffic.
- Create New Firewall Rules (if necessary): If you need to allow specific traffic that is currently blocked, you can create new firewall rules. To create a new rule:
- Click on “Create a Page Rule” or “Create Firewall Rule” depending on your specific needs.
- Define the rule criteria, such as the URL path, IP address, or country.
- Specify the action to take for matching traffic. You can choose to “Allow,” “Challenge,” or “Block” the traffic.
- Whitelist Legitimate IP Addresses: If you have specific IP addresses or ranges that should always be allowed, create a whitelist rule to ensure these IPs are never blocked.
- Regularly Review and Adjust Rules: It’s important to periodically review your firewall rules to ensure they remain relevant and effective. As your website evolves, traffic patterns may change, so adjust rules accordingly.
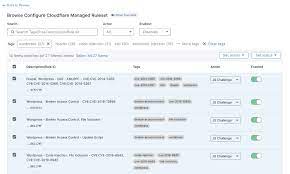
- Use Cloudflare Managed Rulesets: Cloudflare offers managed rulesets, such as the OWASP ModSecurity Core Ruleset, which can help protect your website from common security threats while allowing legitimate traffic. Consider enabling and configuring these rulesets if they are not already in use.
- Monitor Firewall Events: Keep an eye on firewall events in the Cloudflare dashboard. This can help you identify any blocked or challenged traffic. Review these events to determine if there are false positives and adjust your rules accordingly.
- Test Your Website: After adjusting your firewall settings, it’s essential to thoroughly test your website to ensure that Error 523 is resolved and that legitimate traffic flows smoothly.
6. Network Connectivity
Network connectivity is a critical factor in resolving Cloudflare Errors, as it serves as the foundation for the communication between Cloudflare and your web server. Issues with network connectivity can lead to interruptions in data exchange, potentially causing Error 523. Here are the steps to systematically examine and address network connectivity issues:
- Check Local Network: Start by verifying the status of your local network. Ensure that you have a stable and uninterrupted internet connection on your end. This is crucial because network issues can occur not only on the server side but also at your location.
- Check Server’s Network Connection: Access your server’s network settings to confirm that it has a stable internet connection. You can do this through your server’s command line or network configuration settings.
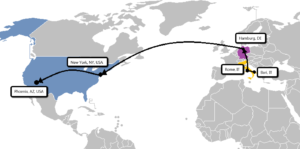
- Ping and Traceroute: Use the ping and traceroute (or tracers on Windows) commands to test the connectivity between your local machine and your server. These commands can help you identify network issues.
- Open a command prompt or terminal window on your local machine and enter
ping your-server-ipto test the connection to your server. - Use
traceroute your-server-iportracert your-server-ipto trace the route to your server and identify any potential issues along the way.
- Open a command prompt or terminal window on your local machine and enter
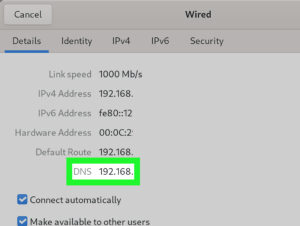
- Check DNS Resolution: Confirm that DNS resolution is working correctly. If your DNS isn’t resolving properly, your browser may not be able to find your server.
- Use the
nslookupordigcommand on your local machine to check if your domain resolves to the correct IP address.
- Use the
- Examine Router and Firewall Settings: Check your local router and firewall settings for any configurations that might be blocking your server’s IP address or certain ports. Ensure that your server’s IP is not blacklisted.
- ISP or Hosting Provider Issues: Contact your internet service provider (ISP) or hosting provider to inquire about potential network issues. They can often run diagnostics on their end to ensure there are no problems.
- Check Server’s Firewall: Examine your server’s firewall settings to ensure that it’s not blocking incoming traffic from Cloudflare. Review the firewall rules and ensure they are configured correctly.
- Inspect Server’s Hardware: Physical hardware issues, such as a failing network card, can also disrupt network connectivity. Check your server’s hardware and network components for any problems.
- Restart Network Services: If you find no specific issues in the above steps, consider restarting network services on your server. Use commands like
systemctl restart networking(Linux) or restart the network adapter in the server’s settings. - Contact Hosting Provider: If you are using a hosting provider, and you suspect the issue is on their end, reach out to their support for assistance. They can investigate server-related network problems.
- Test Website Accessibility: After addressing any network connectivity issues, test your website by accessing it through a web browser to ensure that Error 523 is resolved and that it loads without interruptions.
Conclusion
In conclusion, resolving Cloudflare Error 523 is crucial to maintaining your website’s availability and performance. By following the steps outlined in this guide and understanding the potential causes of the error, you can effectively diagnose and fix the issue. Remember to check your origin server, DNS settings, SSL certificate, firewall rules, and network connectivity. With these expert tips, your website will be back up and running smoothly in no time.
Remember, a well-optimized website not only attracts more visitors but also ensures a positive user experience. Stay proactive in maintaining your site, and you’ll be on your way to digital success
FAQs (Frequently Asked Questions)
-
What is Cloudflare Error 523?
Cloudflare Error 523, also known as “Origin Is Unreachable,” is an HTTP error that occurs when Cloudflare can’t establish a connection to your web server.
-
How can I check if my origin server is running?
You can verify if your origin server is running by trying to access it directly using its IP address. If you can’t access it, there might be issues with the server itself.
-
Why do DNS settings matter in resolving Error Code 523?
DNS settings control how traffic is routed to your server. Incorrect DNS settings can prevent Cloudflare from connecting to your server, resulting in Error 523.
-
What should I do if my SSL certificate has expired?
If your SSL certificate has expired, you should renew it through your certificate provider and update it in your server’s settings.
-
How can I adjust Cloudflare firewall settings to prevent Error 523?
You can adjust Cloudflare firewall settings by creating custom rules that allow legitimate traffic while blocking malicious requests. Be cautious not to over-restrict, as this can trigger the error.
-
What should I do if I suspect network connectivity issues?
If you suspect network connectivity issues, contact your internet service provider (ISP) or your hosting provider to investigate and resolve the problem.