

iCloud is a cloud storage and synchronization service provided by Apple Inc. It allows users to store data such as photos, videos, documents, and more, and access them across multiple devices. However, sometimes users may encounter an error when trying to connect to the iCloud server. This can be frustrating, especially if you rely on iCloud for your important files and data. In this article, we will explore the top 10 ways to fix the iCloud error connecting to the server. Whether you are using an iPhone, iPad, or Mac, these solutions will help you resolve the issue and regain access to your iCloud account and data.
Contents
- 1 Common Causes Of The iCloud Error Connecting To Server Include:
- 1.1 How to Fix iCloud Error Connecting to Server? Top 10 Ways to Fix
- 1.1.1 Method 1. Check Your Internet Connection
- 1.1.2 Method 2. Update iOS or macOS To Solve iCloud Error Connecting to Server
- 1.1.3 Method 3. Sign Out and Sign Back In
- 1.1.4 Method 4. Restart Your Device To Fix the iCloud Error Connecting to the Server
- 1.1.5 Method 5. Check iCloud Status
- 1.1.6 Method 6. Disable iCloud Services Temporarily
- 1.1.7 Method 7. Reset Network Settings
- 1.1.8 Method 8. Check Firewall and Antivirus Settings
- 1.1.9 Method 9. Clear iCloud Cache To Solve iCloud Error Connecting to Server
- 1.1.10 Method 10. Contact Apple Support
- 1.2 Frequently Asked Questions (FAQs)
- 1.2.1 Q: Why am I getting an iCloud error connecting to the server?
- 1.2.2 Q: How long does it take to fix the iCloud error connecting to the server?
- 1.2.3 Q: Will fixing the iCloud error delete my data?
- 1.2.4 Q: Can I access iCloud from a Windows PC?
- 1.2.5 Q: Is iCloud free to use?
- 1.2.6 Q: Can I use iCloud on multiple devices?
- 1.3 Conclusion
- 1.1 How to Fix iCloud Error Connecting to Server? Top 10 Ways to Fix
Common Causes Of The iCloud Error Connecting To Server Include:
- Network Issues: Poor or unstable internet connection can prevent your device from establishing a connection with the iCloud server. Ensure that you have a reliable network connection before attempting to connect to iCloud.
- Outdated Software: Using outdated versions of iOS or macOS can lead to compatibility issues with iCloud services. Make sure your device is running the latest software updates to ensure smooth connectivity.
- Incorrect iCloud Settings: Misconfigured iCloud settings on your device can result in connection errors. Double-check your iCloud settings to ensure that they are correctly configured.
- Firewall or Antivirus Interference: Firewalls or antivirus software on your device or network may block the connection to iCloud servers. Adjust the settings to allow iCloud access through the necessary ports and protocols.
- Server Maintenance or Downtime: Apple occasionally performs maintenance or experiences server downtime, which can temporarily disrupt iCloud services. Check Apple’s system status page to see if there are any reported issues.
- iCloud Service Disruption: iCloud services can experience disruptions or outages due to technical problems on Apple’s end. In such cases, the error connecting to the server is beyond your control and requires waiting for the services to be restored.
- iCloud Account Issues: Issues with your iCloud account, such as incorrect login credentials or account conflicts, can prevent you from connecting to the server. Verify your Apple ID and password to ensure they are entered correctly.
- Overloaded iCloud Servers: During periods of high usage or heavy data traffic, iCloud servers may become overloaded, resulting in connection errors. In such cases, patience is key, and trying again at a later time may resolve the issue.
- DNS Settings: DNS (Domain Name System) settings can affect your device’s ability to connect to iCloud servers. Ensure that your DNS settings are properly configured or try using a different DNS server.
- Device-Specific Issues: Some iCloud connection errors may be specific to certain devices or models. Check for any device-specific troubleshooting steps provided by Apple for your particular device.
How to Fix iCloud Error Connecting to Server? Top 10 Ways to Fix
Method 1. Check Your Internet Connection
To begin troubleshooting the iCloud server connection error, it’s crucial to first confirm the presence of a steady and dependable internet connection. Inadequate internet connectivity may disrupt your device’s ability to establish contact with the iCloud server. Verify that you are currently linked to a robust Wi-Fi network or cellular data, ensuring that the signal strength is strong and consistent. Additionally, exploring an alternative network connection is advisable to determine if the issue persists. It’s worth noting that unstable internet connectivity not only impacts your device’s connection to iCloud but can also be a contributing factor to the ‘Cannot Verify Server Identity‘ error.
Method 2. Update iOS or macOS To Solve iCloud Error Connecting to Server
Updating iOS:
- Connect to a Wi-Fi network: Make sure your device is connected to a stable Wi-Fi network. It’s recommended to use Wi-Fi instead of cellular data to avoid additional charges and ensure a faster update process.
- Backup your device: Before updating, it’s essential to back up your iPhone or iPad to prevent data loss in case of any issues during the update. You can back up your device using iCloud or iTunes.
- Check available storage: Ensure that you have enough storage space on your device to accommodate the update. Go to Settings > General > iPhone/iPad Storage to check your available storage and delete any unnecessary data if needed.
- Open Settings: Locate the Settings app on your device’s home screen and tap on it to open.
- Go to General: Scroll down in the Settings menu and tap on “General.”
- Select Software Update: In the General settings, look for “Software Update” and tap on it.
- Check for updates: Your device will now check for available updates. If an update is available, you will see a message indicating its availability.
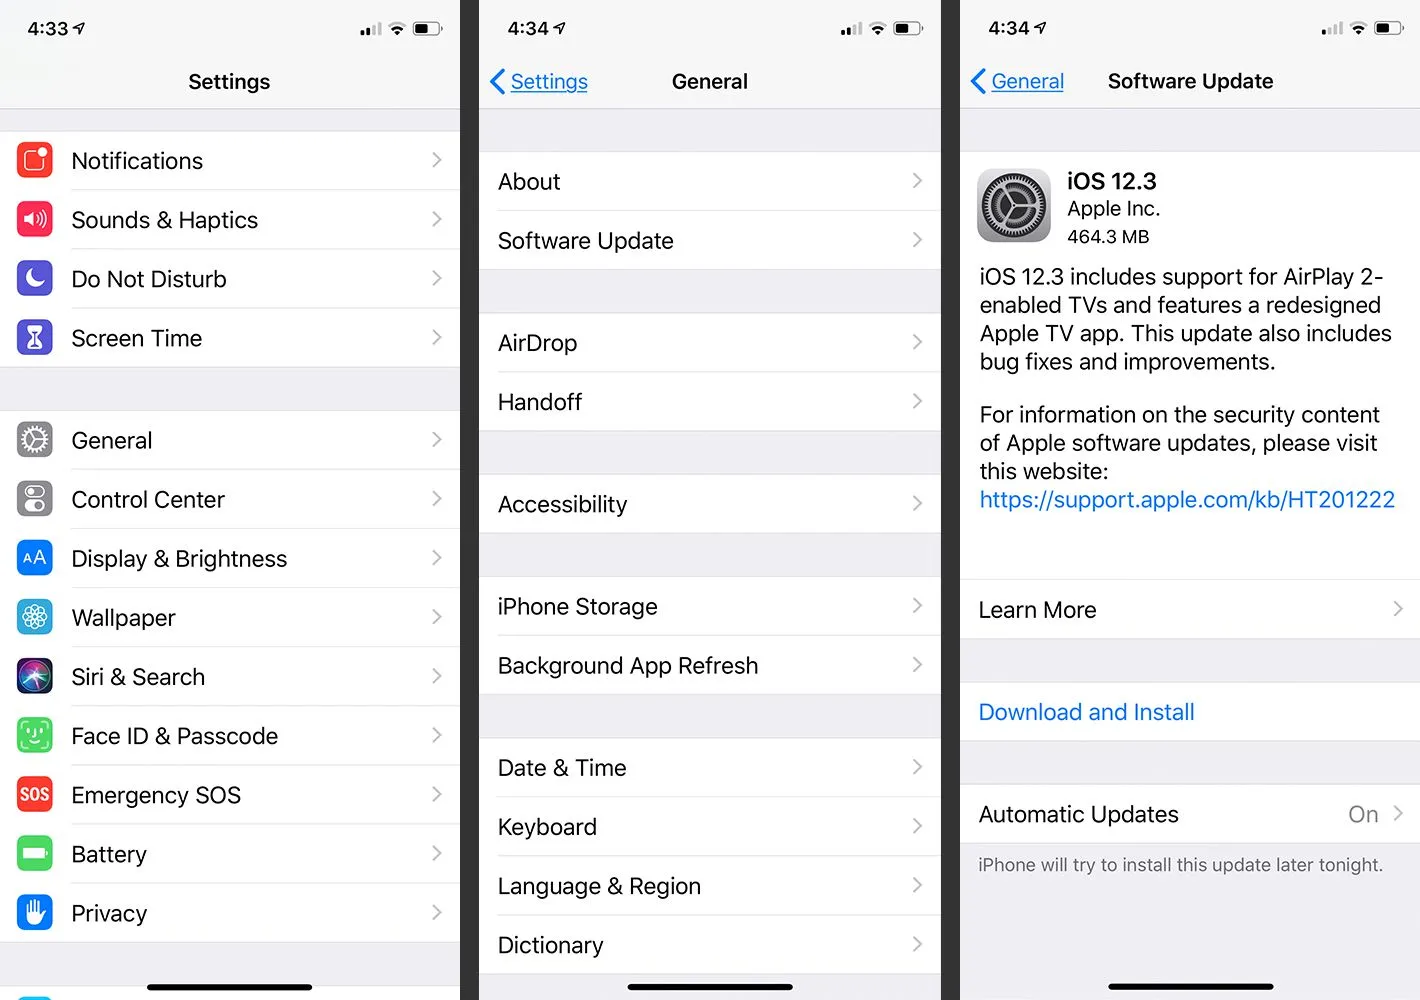
- Download and install: If an update is available, tap on “Download and Install.” If prompted, enter your passcode to proceed. Ensure that your device has sufficient battery power or is connected to a power source during the update.
- Agree to terms and conditions: Once the update is downloaded, you will be asked to review and agree to the terms and conditions. Tap on “Agree” to continue.
- Install the update: Your device will now begin the installation process. It may take some time, and your device will restart during the update. Follow the on-screen instructions and wait for the update to complete.
- Set up your device: After the update is installed, your device will restart again. Follow the setup process, enter your Apple ID and password, and restore your data from the backup you created earlier if necessary.
You Might Also Like, Easy Methods to Fix DNS Server Not Responding in Windows 10
Updating macOS:
- Connect to the Internet: Ensure that your Mac is connected to a stable Internet connection.
- Backup your data: Before updating macOS, it’s crucial to back up your important files and data. You can use Time Machine or another backup method to create a backup of your Mac.
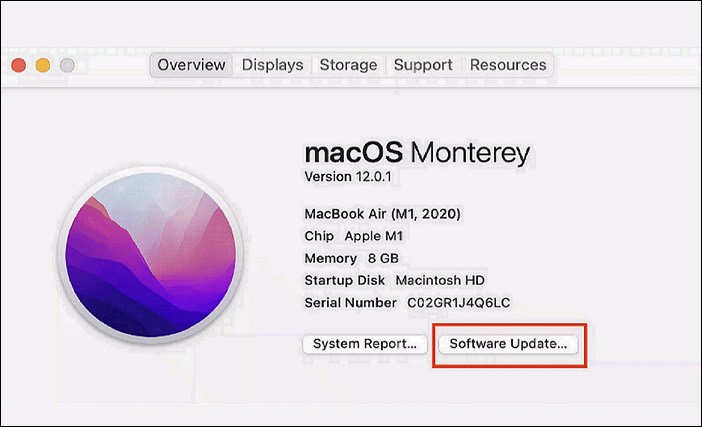
- Open the App Store: Click on the Apple menu in the top-left corner of your screen and select “App Store” from the dropdown menu.
- Go to the Updates tab: In the App Store, click on the “Updates” tab located at the top of the window.
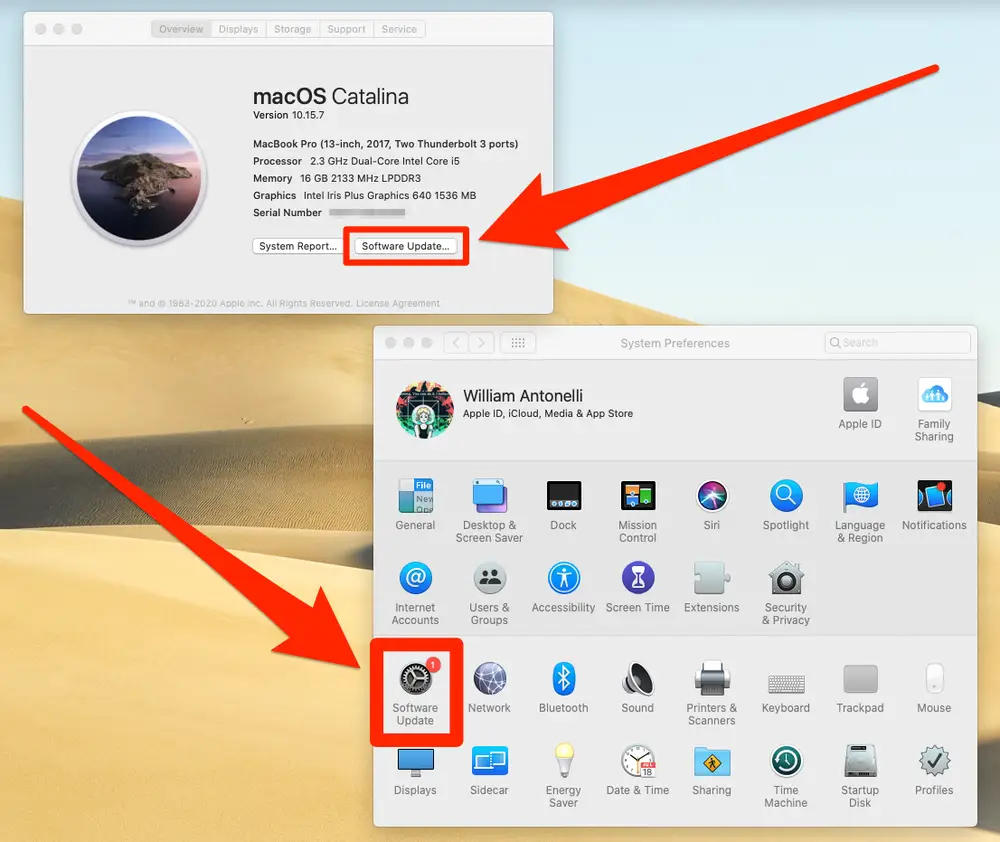
- Check for updates: The App Store will now check for available updates. If a macOS update is available, it will appear in the Updates tab.
- Download and install: If a macOS update is available, click on the “Update” button next to it. Enter your Apple ID and password if prompted and wait for the download to complete.
- Start the installation: Once the update is downloaded, a window will appear, guiding you through the installation process. Click on “Continue” and follow the on-screen instructions.
- Agree to terms and conditions: During the installation process, you will be presented with the terms and conditions. Read through them and click on “Agree” to proceed.
- Select the installation destination: If prompted, choose the destination where you want to install the update. Typically, it will be your Mac’s main hard drive.
- Wait for the installation to complete: The installation process may take some time, depending on the size of the update and the speed of your Mac. Your Mac will restart during the installation process.
- Set up your Mac: Once the update is installed and your Mac restarts, followthe on-screen instructions to set up your Mac. You may need to enter your Apple ID and password and customize various settings.
- Restore your data: If you backed up your data before updating, you can now restore your files and data using Time Machine or the backup method you used. Follow the prompts and select the backup you created to restore your data.
By following these detailed bullet steps, you can successfully update your iOS or macOS device and ensure that you have the latest features, bug fixes, and security enhancements provided by Apple.
Method 3. Sign Out and Sign Back In
Here’s a detailed guide on how to sign out and sign back into iCloud:
- Step 1: Open the Settings app on your iPhone or iPad.
- Step 2: Scroll down and tap on your name at the top of the screen.
- Step 3: In the Apple ID settings, scroll to the bottom and tap on “Sign Out.”

- Step 4: A pop-up window will appear, asking if you want to keep a copy of your data on this device. You can choose to keep a copy or remove it from this device. Make your selection based on your preference and tap “Sign Out” again.
- Step 5: You will be asked to enter your Apple ID password to confirm the sign-out. Enter your password and tap “Turn Off.”
- Step 6: After signing out, you will be back on the Apple ID settings page. You will notice that your name and profile picture are no longer displayed.
- Step 7: To sign back in, tap on “Sign in to your iPhone/iPad” at the top of the screen.

- Step 8: Enter your Apple ID and password in the respective fields. You can also use Touch ID or Face ID if enabled on your device.
- Step 9: After entering your Apple ID credentials, tap on “Sign In.”

- Step 10: You may be prompted to set up iCloud Keychain, Siri, or other iCloud services. Choose the options according to your preference.
- Step 11: You will now be signed back into iCloud, and your name and profile picture will be displayed in the Apple ID settings.
- Step 12: Allow some time for your device to sync with iCloud and restore your data, such as contacts, photos, and app data.
By following these steps, you can successfully sign out and sign back into your iCloud account on your iPhone or iPad. This process can help refresh the connection between your device and iCloud services, resolving any potential issues with iCloud connectivity
Also Find,
Step-by-Step Guide to Fix 500 Internal Server Error Nginx? [9 Solutions]
Method 4. Restart Your Device To Fix the iCloud Error Connecting to the Server
Here’s how to restart different Apple devices:
Restarting an iPhone or iPad:
- Press and hold the power button (also known as the side or top button) until the power off slider appears on the screen.
- Swipe the power off slider from left to right to turn off the device.
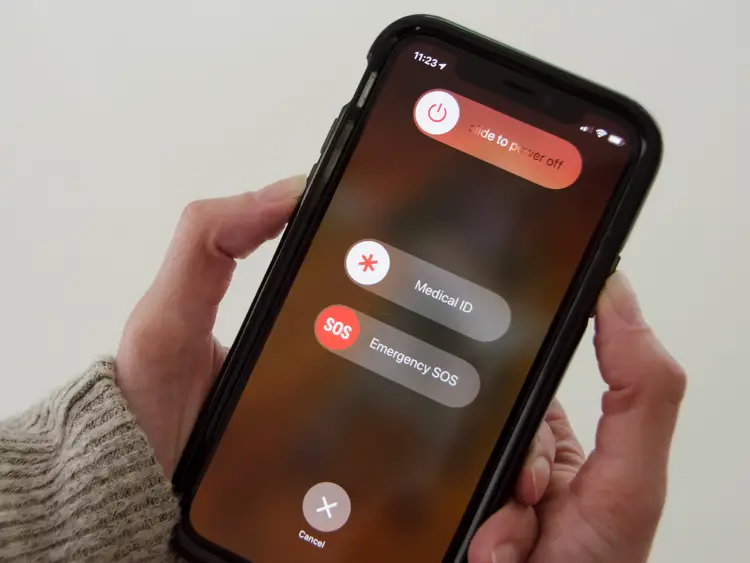
- Once the screen goes completely dark, press and hold the power button again until the Apple logo appears.
- Release the power button, and the device will restart.
Restarting a Mac:
- Click on the Apple menu in the top-left corner of the screen.
- From the dropdown menu, select “Restart.”

- A confirmation dialog will appear, asking if you want to restart your Mac. Click “Restart” to proceed.
- The Mac will shut down and automatically restart.
Restarting an Apple Watch:
- Press and hold the side button (located below the Digital Crown) until the power off slider appears on the screen.
- Drag the power off slider to the right to turn off the Apple Watch.
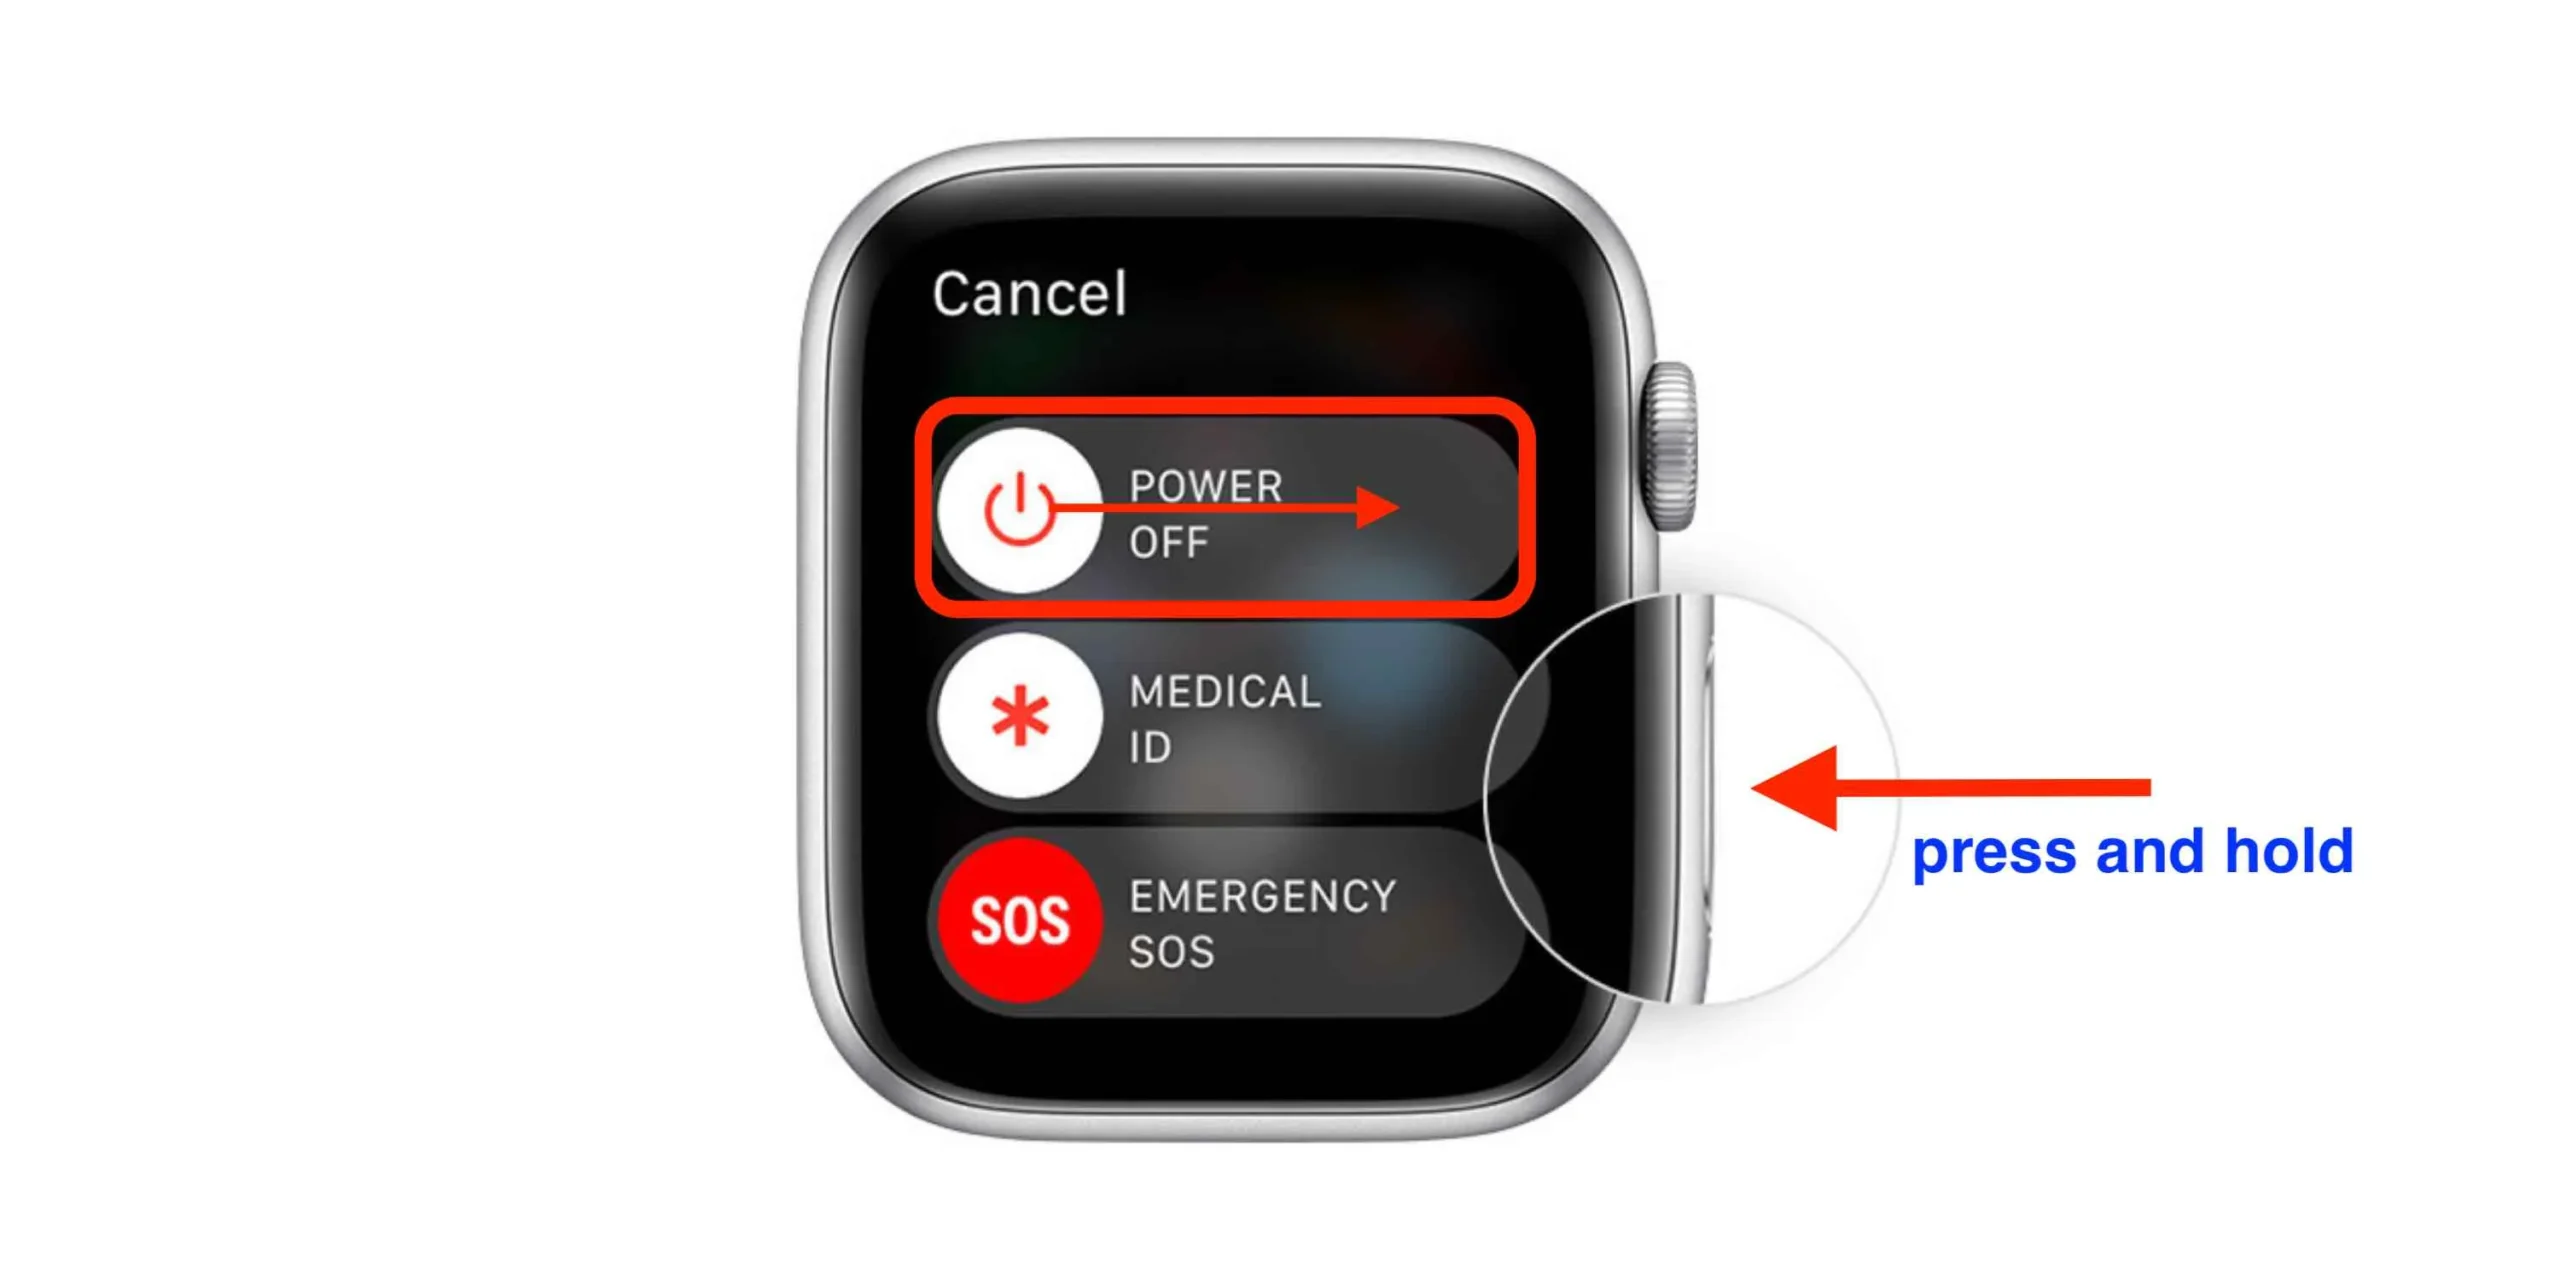
- Once the screen goes black, press and hold the side button again until the Apple logo appears.
- Release the side button, and the Apple Watch will restart.
Restarting an Apple TV:
- On the Apple TV remote, press and hold the Home and Menu buttons simultaneously.
- Keep holding both buttons until the status light on the Apple TV starts blinking rapidly.
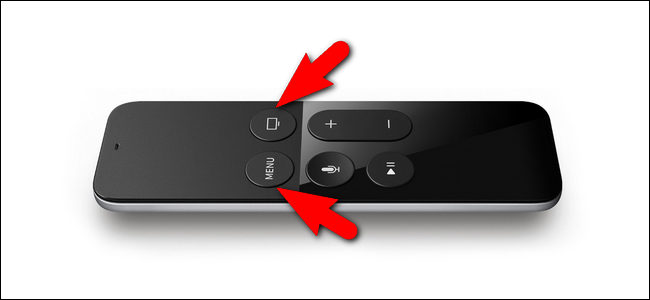
- Release the buttons, and the Apple TV will restart.
Restarting a HomePod:
- Unplug the power cord from the back of the HomePod.
- Wait for about 10 seconds.
- Plug the power cord back into the HomePod.
- The HomePod will boot up and restart.
By following these steps, you can easily restart different Apple devices. Restarting can help resolve various issues or glitches that may occur during device usage and ensure a fresh start.
Method 5. Check iCloud Status
Here’s how to check iCloud status:
- Step 1: Open a web browser on your computer or mobile device.
- Step 2: In the address bar, type “https://www.apple.com/support/systemstatus/” and press Enter.
- Step 3: The webpage that loads is the Apple System Status page. It provides real-time information about the status of Apple’s services, including iCloud.
- Step 4: Look for the section labeled “iCloud” on the page. It typically appears toward the top of the list.
- Step 5: Under the iCloud section, you will see a series of green dots or circles, indicating the operational status of various iCloud services.
- Green dot: This indicates that the service is operating normally.
- Yellow dot: This indicates a service issue or disruption that is being actively investigated.
- Red dot: This indicates a service outage or disruption that is affecting the functionality of the service.
- Step 6: Check the status of the iCloud services you are interested in, such as iCloud Drive, iCloud Photos, iCloud Mail, etc.

- Step 7: If there are any yellow or red dots next to the iCloud services you use, it means there is an ongoing issue or outage affecting those services.
- Step 8: Click on the “Details” link next to the specific service to get more information about the issue, including any additional steps or workarounds provided by Apple.
- Step 9: You can also scroll down on the System Status page to see historical data about past incidents and their resolution.
By following these steps, you can easily check the status of iCloud services using the Apple System Status page. This helps you determine if there are any known issues or disruptions that may be causing problems with your iCloud connectivity.
Method 6. Disable iCloud Services Temporarily
Here’s how to disable iCloud services temporarily:
On iPhone or iPad:
- Open the Settings app on your iPhone or iPad.
- Scroll down and tap on your name at the top of the screen.
- In the Apple ID settings, tap on “iCloud.”
- You will see a list of iCloud services that are enabled on your device, such as iCloud Drive, Photos, Contacts, etc.
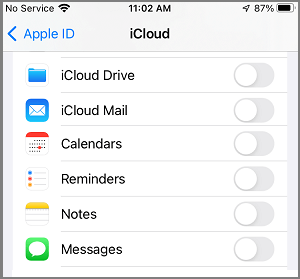
- To temporarily disable a specific iCloud service, toggle off the switch next to it. The switch will turn white when disabled.
- Repeat this step for any other iCloud services you want to disable temporarily.
- Once you have disabled the desired services, exit the Settings app.
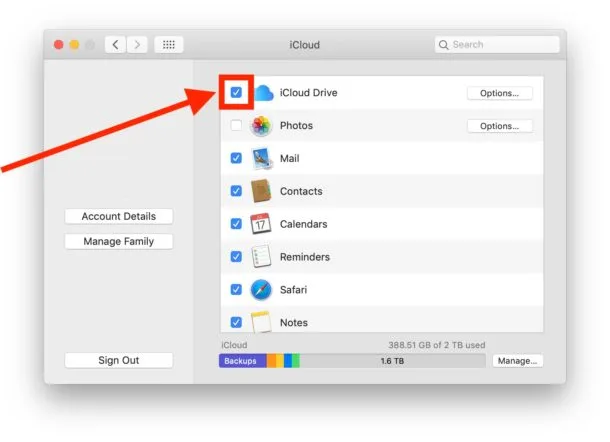
On Mac:
- Click on the Apple menu in the top-left corner of the screen.
- Select “System Preferences” from the dropdown menu.
- In the System Preferences window, click on “Apple ID.”
- On the left side of the Apple ID settings, click on “iCloud.”
- A list of iCloud services will be displayed on the right side.
- To temporarily disable a specific iCloud service, uncheck the box next to it. The box will be empty when disabled.
- Repeat this step for any other iCloud services you want to disable temporarily.
- Close the System Preferences window.
By following these steps, you can temporarily disable specific iCloud services on your iPhone, iPad, or Mac. Disabling iCloud services can be helpful in troubleshooting iCloud connectivity issues or if you want to temporarily stop syncing certain data. Remember to re-enable the services when you’re ready to use them again by toggling the switches back on (on iPhone or iPad) or checking the boxes again (on Mac).
Method 7. Reset Network Settings
Resetting network settings in iCloud is not directly possible as iCloud is a cloud storage and synchronization service. However, you can reset network settings on your iPhone or iPad, which may help resolve connectivity issues related to iCloud. Here’s how you can reset network settings on your iOS device:
- Open the Settings app on your iPhone or iPad.
- Scroll down and tap on “General.”
- Scroll to the bottom and tap on “Reset.”
- Among the reset options, tap on “Reset Network Settings.”
- You may be prompted to enter your device passcode or Apple ID password for confirmation.
- A warning message will appear, stating that resetting network settings will remove saved Wi-Fi networks, passwords, and VPN settings. Confirm your decision by tapping on “Reset Network Settings.”
- The device will restart, and the network settings will be reset to their default values.
- After the device restarts, you’ll need to reconnect to Wi-Fi networks and re-enter any Wi-Fi passwords.
By following these steps, you can reset network settings on your iPhone or iPad, which may help resolve network-related issues affecting your iCloud connectivity. Keep in mind that resetting network settings will remove saved Wi-Fi networks and passwords, so you’ll need to reconfigure them after the reset.
Method 8. Check Firewall and Antivirus Settings
Open the Security or Antivirus Software:
- Locate the security or antivirus software installed on your device.
- It is usually accessible through an icon in the system tray or the applications menu.
- Double-click the icon to open the security software.
- Look for an option or tab labeled “Firewall” or “Network Protection” within the security software.
- Click on the option to access the firewall settings.
Review Firewall Configuration:
- Check if the firewall is enabled or disabled.
- If it is disabled, enable it to ensure protection.
- Look for any specific settings related to application permissions or network access.
Add Exceptions or Allow Access:
- Find the option to add exceptions or allow access to specific applications or ports.
- Click on the option to add a new exception or allow access.
Configure Firewall for iCloud:
- Add iCloud as an exception or allow access to iCloud services.
- Look for options to enter specific IP addresses, domains, or ports for iCloud.
- Consult the documentation or support resources for your security software if you need assistance.
Save and Apply Changes:
- After making any necessary changes to the firewall settings, save and apply the modifications.
- Look for a “Save,” “Apply,” or “OK” button within the firewall settings interface.
- Click on the button to save and apply the changes.
Close Security Software:
- Once you have reviewed and adjusted the firewall settings, close the security or antivirus software.
By following these steps, you can check the firewall and antivirus settings on your device to ensure that they are not blocking the connection to iCloud servers. It is important to consult the documentation or support resources specific to your security software for accurate guidance on adding exceptions or allowing access to iCloud services.
Method 9. Clear iCloud Cache To Solve iCloud Error Connecting to Server
Clearing the cache for iCloud can help resolve any corrupted or outdated data that might be causing the error. On an iPhone or iPad, go to Settings > [Your Name] > iCloud > iCloud Storage > Manage Storage. Select an app from the list and tap “Delete Documents & Data.” Repeat this process for each app listed under iCloud Storage.
On a Mac, open System Preferences > Apple ID > iCloud > Manage. Select an app from the list and click “Delete Documents.” Clearing the cache for iCloud can improve its performance and resolve connection error.
Method 10. Contact Apple Support
If none of the previous solutions have resolved the iCloud error connecting to the server, it may be necessary to contact Apple Support for further assistance. Apple’s support team can provide personalized guidance and troubleshooting steps based on your specific situation. Visit the Apple Support website (https://support.apple.com) to find the appropriate contact information for your region. Explain the issue you are experiencing and the steps you have already taken to troubleshoot. The support team will work with you to find a solution and get your iCloud connection back up and running.
Frequently Asked Questions (FAQs)
Q: Why am I getting an iCloud error connecting to the server?
A: There can be various reasons why you are experiencing an iCloud error connecting to the server. It could be due to network issues, outdated software, incorrect settings, or problems with the iCloud service itself. By following the top 10 ways mentioned in this article, you can troubleshoot and fix the error.
Q: How long does it take to fix the iCloud error connecting to the server?
A: The time it takes to fix the iCloud error connecting to the server depends on the cause of the issue and the troubleshooting steps you take. In some cases, the error can be resolved within minutes by simply signing out and signing back in or restarting your device. However, if the issue is more complex, it may take longer to diagnose and fix. Patience is key, and if you are unable to resolve the error on your own, contacting Apple Support is recommended.
Q: Will fixing the iCloud error delete my data?
A: No, fixing the iCloud error connecting to the server should not delete your data. The troubleshooting steps mentioned in this article are focused on resolving the connectivity issue and do not involve deleting any data from your iCloud account. However, it is always a good practice to regularly back up your important files and data to ensure they are safe in case of any unforeseen issues.
Q: Can I access iCloud from a Windows PC?
A: Yes, you can access iCloud from a Windows PC. Apple provides an iCloud for Windows application that allows you to access your iCloud files, photos, emails, and more on your Windows computer. You can download the iCloud for Windows application from the Microsoft Store or the Apple website. Once installed, you can sign in with your Apple ID and access your iCloud data seamlessly on your Windows PC.
Q: Is iCloud free to use?
A: Yes, iCloud offers a free storage plan that provides users with 5 GB of storage space. This free storage can be used for storing photos, videos, documents, and other files, as well as for backing up your iOS devices. However, if you require additional storage space, Apple offers various paid storage plans with higher capacities. These paid plans provide you with more storage to accommodate your needs.
Q: Can I use iCloud on multiple devices?
A: Yes, iCloud is designed to work seamlessly across multiple devices. You can use iCloud on your iPhone, iPad, Mac, Windows PC, and even on the web. This allows you to access and sync your files, photos, contacts, and more across all your devices. Any changes or updates you make on one device will automatically be reflected on all your other devices connected to the same iCloud account.
Conclusion
Encountering an iCloud error connecting to the server can be frustrating, but with the top 10 ways mentioned in this article, you can troubleshoot and fix the issue. From checking your internet connection to contacting Apple Support, these solutions cover a range of potential causes and offer step-by-step guidance. Remember to keep your device and software updated, and don’t hesitate to reach out to Apple’s support team if you need further assistance. By following these steps, you can regain access to your iCloud account and continue enjoying the benefits of cloud storage and synchronization.